Unit and Global settings


|
Unit and Global settings |
|
|
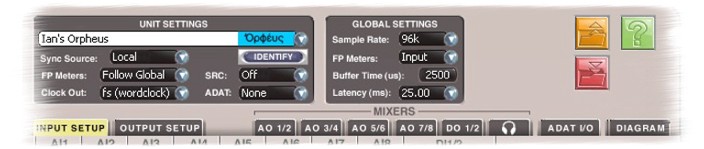
The upper area of the Orpheus Control Panel contains Unit Settings and Global Settings. Unit Settings are applied only to the Orpheus unit which the Control Panel is currently assigned to control, whereas Global Settings apply to all connected Orpheus units as a whole.
The upper area also contains buttons for loading and saving Orpheus configurations, and for accessing the on-line help.
The topmost control in the Unit Settings panel is the Unit Selector. This selects which Orpheus unit is controlled by the rest of the Unit Settings panel, and by the tabbed panels in the lower part of the Control Panel (the Global Settings panel controls all connected units, and is the only part of the Control Panel not affected by the Unit Selector). The Unit Selector is a drop-list which can be dropped by clicking the down-arrow at the right-hand-side, presenting a list of all the connected devices for selection. The name of the selected device is then displayed, along with the device type (e.g. Orpheus, in the high-lit area on the right).
By default, the name of each device is its GUID (Globally Unique Identification number), but this can be changed to a more friendly name (Windows only) by clicking in the left-hand side of the selector and typing in a new name. This doesn't change the unit's GUID, of course - it only associates a friendly name with the GUID whenever the OS or Control Panel applet sees the unit.
Below the Unit Selector is the Identify button. This can be latched on or off by clicking it. When it's on (high-lit red) the LED in the standby switch of the currently-selected unit flashes. This helps to identify each unit in a multi-unit system.
The Sync Source control allows each unit's reference synchronization source to be selected. For more details, see the Synchronization section.
NOTE: If an external sync source such as DI or wordclock is selected, but is either absent or at a different rate from the selected sample rate, all audio is muted. If the reference is later applied at the appropriate rate, audio is re-enabled.
The FP Meters control allows the front panel meters to be switched between the analogue and S/PDIF inputs, and the analogue and S/PDIF outputs. An additional selection, 'Follow Global', allows multiple units' meters to be switched using a single control in the Global Settings. For more information, see the Metering system description. Note that right-clicking on the FP Meters control (control-clicking on one-button Macs) brings up a brightness control for the Orpheus front panel - four different brightness settings can be selected to suit ambient lighting conditions.
The Clock Out control can be used to cause the unit's wordclock output to produce base clock or 256x clock instead of wordclock if required. For more details, see the Synchronization section.
A two-channel sample-rate converter (SRC) can be configured in the S/PDIF input path, or in the S/PDIF output path, or can be disabled, using the SRC control.
ADAT inputs, or ADAT outputs, or both, can be enabled using the ADAT control. By default, ADAT ports are disabled to ease load on the host computer. ADAT Direct mode is a special mode which allows Orpheus to operate as an eight channel analogue-to-ADAT and ADAT-to-analogue converter, as described in the Stand-alone operation section.
NOTE: Changing the ADAT mode causes changes in the number of input and output channels reported to the host computer by Orpheus. It is therefore advisable to close your DAW application before changing the ADAT mode, and to restart it again afterwards, in order to ensure reliable operation.
The Global Settings panel contains a small number of controls which apply to all units in a multi-unit system.
Most important is the Sample Rate control. All units in a multi-unit system must operate at a common rate. For further information about sample rates, see the Synchronization section.
NOTE: It is not possible to change the sample rate in a Windows system whilst any of Orpheus' ports are in use in WDM mode. In this case it is necessary to disconnect the ports from the application before changing the sample rate.
The FP Meters control allows I/O switching of front panel meters across multiple boxes as described above.
In Windows systems, the audio delay through the input and output buffers can be controlled with the Buffer Time and Latency controls. The Buffer Time control sets the duration of a buffer, and the Latency control sets the overall path delay by applying a number of such buffers to the audio path. In general, it is better to keep the Latency in general, and the Buffer Time in particular, quite long. This reduces the risk of audio glitches, as described in the Stability and latency section. Orpheus' low-latency on-board foldback mixing facility reduces the need for the Latency controls to be short. In Mac systems, latency control is handled by OS X.
The green Help button ('?') opens the online version of this manual in a browser window.
The red Save and the orange Load buttons save and load Orpheus settings to and from disk. Note that only settings of the currently-selected unit are affected, so it is necessary to save and load settings of each unit individually in multi-unit systems.
|